Technical Tuesday: Chain Wear
by Mike Levy
Jun 8, 2010
For today's Technical Tuesday we're going to have a closer look at chain wear. We'll explain what exactly is happening to your drivetrain as it wears, as well as how to properly check your chain to see if it's time to replace it. Inside you'll find a video full of information and step by step instructions on how to find out just how worn out your poor chain actually is!
Read on...
Read on...
One thing that all of our bikes have in common despite their intended discipline, amount of travel, or wheel size, is that they're all powered by a bicycle chain. And from what I've seen, there is a pretty good chance that your chain is either already worn out or is very close to being so. Reading comments from past Technical Tuesdays it is pretty clear that everyone wants to learn how to rebuild their suspension or lace up a wheel, and we will be covering those jobs down the road, but we still have some relatively basic tasks to cover first. It's incredible how many very expensive bikes I've seen that have the latest and greatest parts on them, but have drivetrains that are completely worn out. This is unacceptable in my books! For this Technical Tuesday we are going to show you how to not only properly check for chain wear and some of it's symptoms, but we'll also explain exactly what is happening to your drivetrain as it becomes more and more worn.
Tools needed: Chain checker or tape measure.
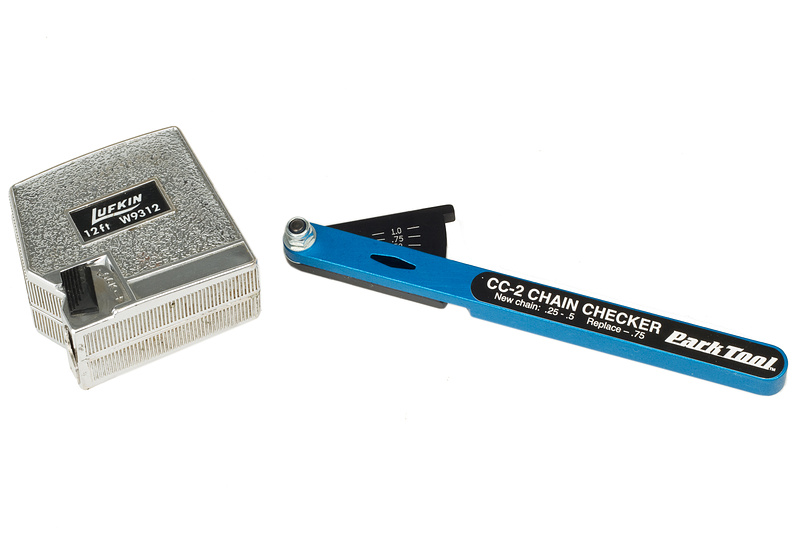 |
| A Park CC-2 chain checker or a tape measure can be used |
A modern bicycle chain is made up of inner plates, outer plates, pins, and finally the rollers. The pins are pressed through the outer plates and the rollers and inner plates are free to rotate on them. This allows the chain to circle freely around the chainrings, cogs, and pulley wheels. Two things are happening to your chain as it begins to wear. The most obvious symptom is known as "chain stretch", but the name is a bit misleading. It would be easy to be mistaken in thinking that the inner and outer plates actually stretch with use, but that isn't the case. What is actually happening is the tolerances of the press fit between the chain pins and outer plates is increasing over time and as the small gaps get bigger, the distance between the chain pins get bigger and the total length of the chain increases. The other symptom of a worn chain is rollers that both seem to have shrunk in size, as well as have a lot more room to "float" in the space between the two inner plates. As a chain is used, the rollers slowly get worn down from contact with the cogs and chainrings. As they get smaller, the gap between them obviously increases in size. Further exasperating this issue is how the roller has room to rattle or float within the inner plates. This is caused by wearing down of the inner shoulder that the rollers turn on. So the question is then, how does a worn chain effect the rest of your drivetrain?
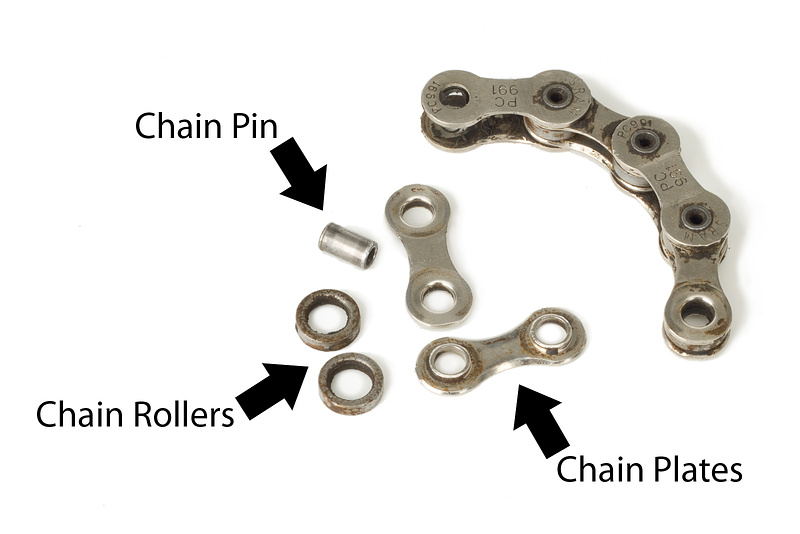 |
| A chain is made up of the inner plates, outer plates, rollers, and chain pins |
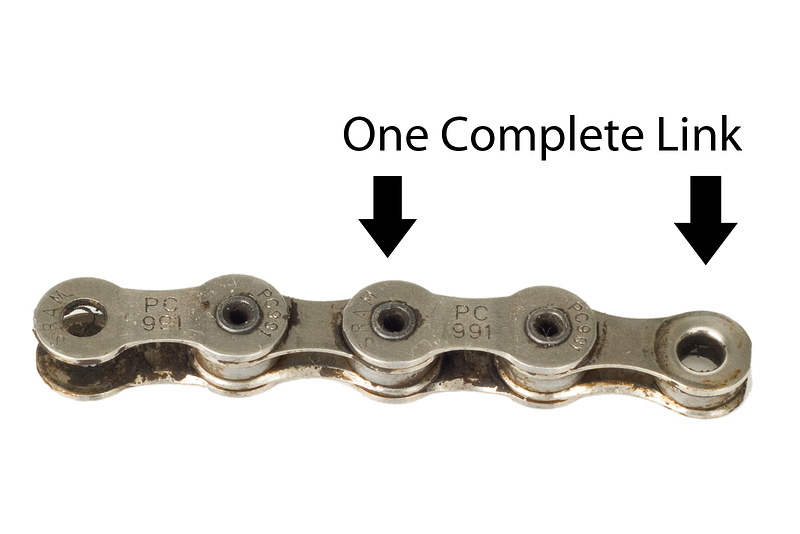 |
| One complete link consist of a both inner and out plates |
A new bicycle chain has a pitch of 1/2" (pitch is the measurement from one chain pin to the next) that matches the same pitch on our chainrings and cogs. The pitch of a chain gets longer as a chain wears. The chain rollers that apply torque to the same spot on each gear tooth as you pedal will slowly wear the teeth as well, although at a slower rate than the chain itself wears. The teeth on the cog or chainring are shaped to work perfectly with the size of the rollers on a half inch chain, as well as being just the right distance apart from their neighbor. Material is slowly removed from the leading edge of the gear teeth as a worn chain applies torque to them, and the ever important distance between each tooth actually gets larger as this happens. This is most evident when you install a new chain on a worn out cassette and discover that it skips under load. Simply put, the new chain will not fit the worn cassette due to the gaps between the teeth now being too large for the new chain and it's 1/2" pitch. There isn't enough engagement to keep it from skipping as you pedal hard. Because a chain wears faster than a cassette, it makes sense to replace your chain multiple times before they become too worn, thereby making your cassette last much longer. The teeth on a worn cassette will have a much more pronounced point to them and look very much like a shark's fin. Chainrings generally wear much slower due to much more contact with the chain which distributes the load over a greater area. Even when a large chainring is badly worn, it may not skip simply due to the amount of wrap that the chain has around it. Middle and small chainrings are another story though...
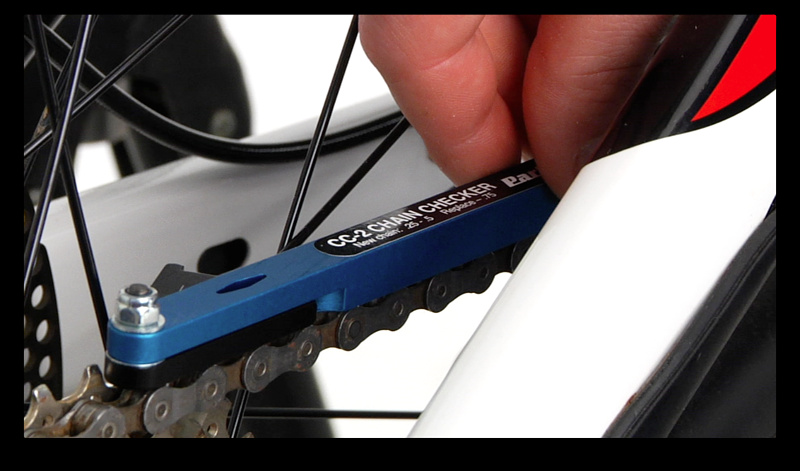 |
| Step 1. Turn the gauge on the CC-2 tool to zero and place both pins into the gap between the rollers |
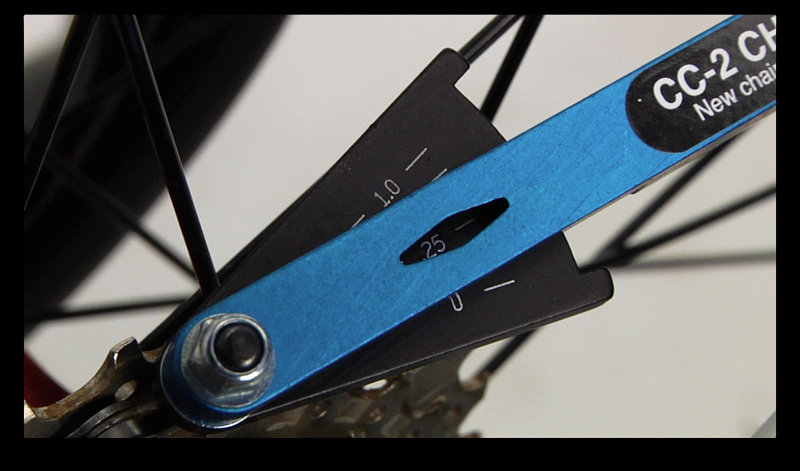 |
| Step 2. The gauge on the CC-2 tool tells you just how worn the chain is. Replace if it's at .75 or higher |
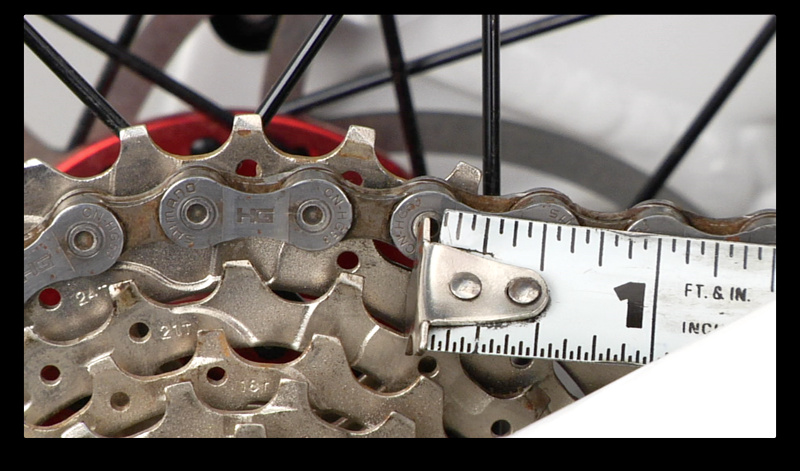 |
| Step 1. Using a tape measure, line up the 0" mark directly with a chain pin |
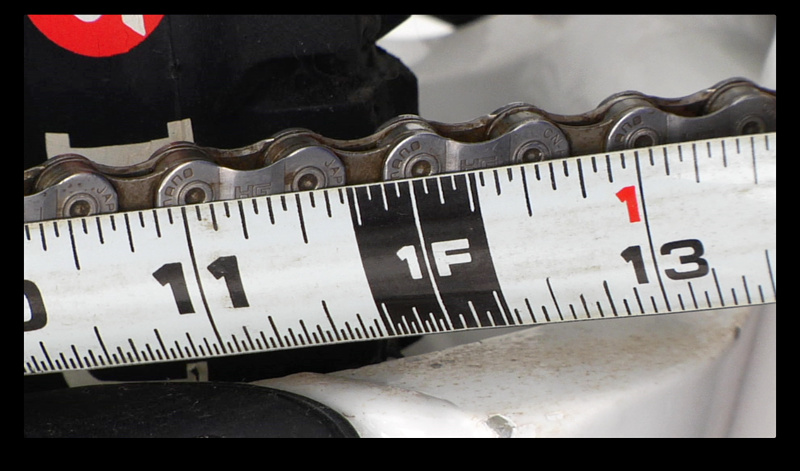 |
| Step 2. Six complete links on a chain in good shape will measure in at 12". Any more that 1/16" needs replacing |
Don't fret if you don't have a specific chain measuring tool, you can also use a standard tape measure or ruler to figure it out. Just like using a chain checker, you can do this while the chain is still on the bike.
• Line up the tape measure so that the zero inch mark is directly in line with one of the chain pins.
• Holding the tape measure in line with the chain, measure out exactly 6 complete links (A link is a set of both inner and outer plates).
• Because the pitch (distance between each link) of the chain is 1/2", 6 complete links on a new chain will measure exactly out to 12".
• If the chain has wear, the pin will line up slightly past the 12" mark on the tape measure. A general rule of thumb is to replace the
chain once it is over 1/16" past the 12" mark.
 What next
Comments